Showing posts with label DIY. Show all posts

Sunday, 3 October 2010

IKEA hacking


Sunday feels like the perfect day for some DIY, whether it's doing it or posting about it! This one is old and totally unrelated to fashion, but I thought it was worthwhile posting. Well, we have to give our homes some stylish solutions too, non?

Here's the thing:
When I moved into my apartment last year, the stove and the fridge ended up having this annoying gap between them. I thought it would be a pity to just to let it be and leave all this valuable storage/counter space unexploited, so I got busy going through the IKEA catalogue for something that would fit the gap just right.


I was lucky. Hello there, super-cheap HYLLIS metal shelves!

At 60cm deep and 27cm wide, it was like if I had ordered them to fit. And if I remember correctly, I paid 12 euros for them, but the price in the new 2011 catalogue has been reduced and they now cost only 8,95 in Greece. Total bargain.

Problem was, HYLLIS is tall. I wanted something that would act as a extension of the stove top, so I would be able to use the surface while cooking, letting pots and pans cool off and stuff like that. HYLLIS is 140cm tall while my stove only reaches 85cm.

So I grabbed my saw.
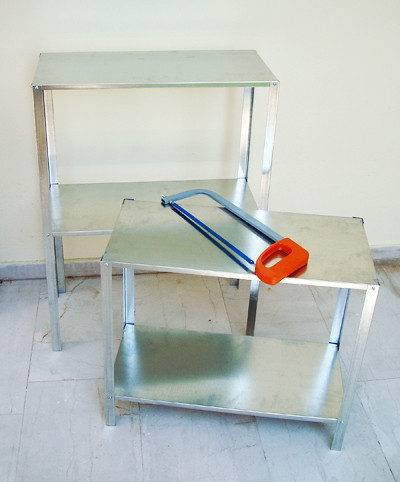
DIY1s
The shortest half is the one that used to be the bottom and the now tall half used to be the top. I sawed just over the third shelf, and the height of the top half turned out to be just perfect as you can see from the first picture of this post.

I only had to go over the legs with some sandpaper so I could pop on the plastic thingies that protect your floor from the metal, and it was ready!

Do you hack IKEA stuff? Have you ever visited IKEA hacker?

UPDATE:
My hack was featured in IKEA hacker and there are lots of interesting comments posted there as well, take a look!

Saturday, 10 July 2010

Dress to skirt


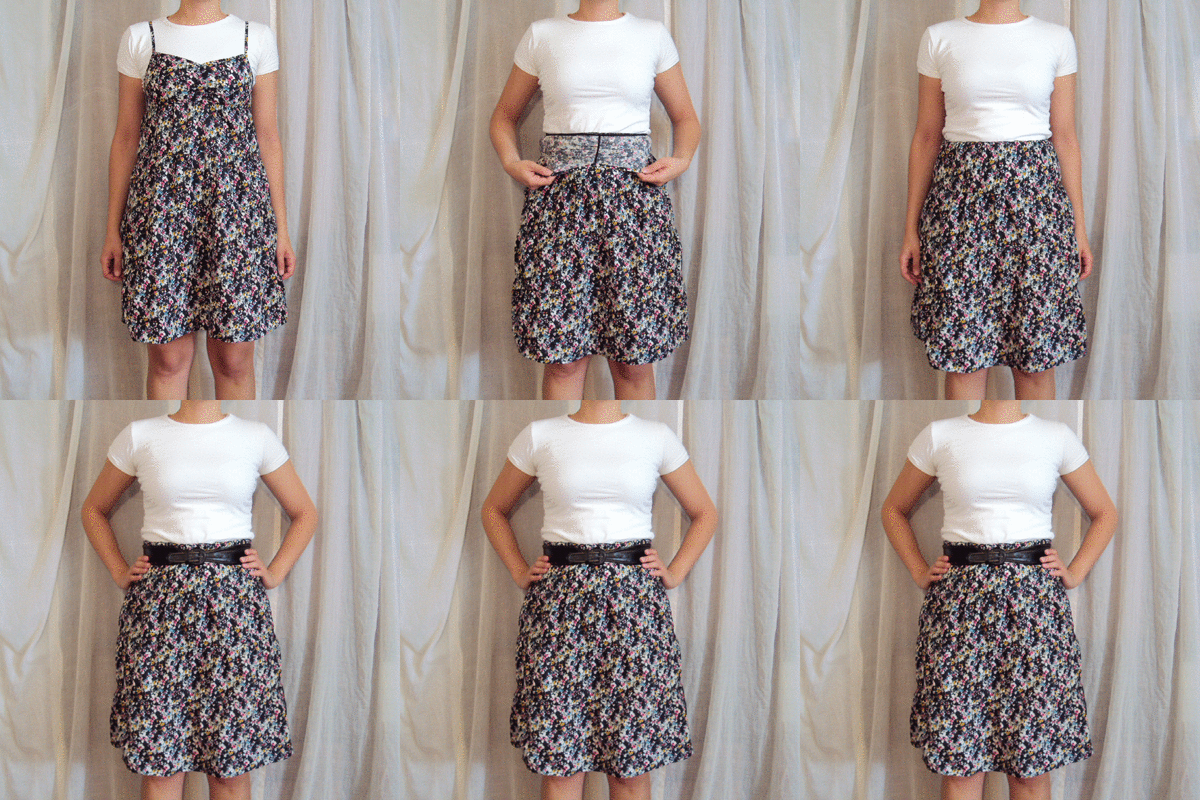
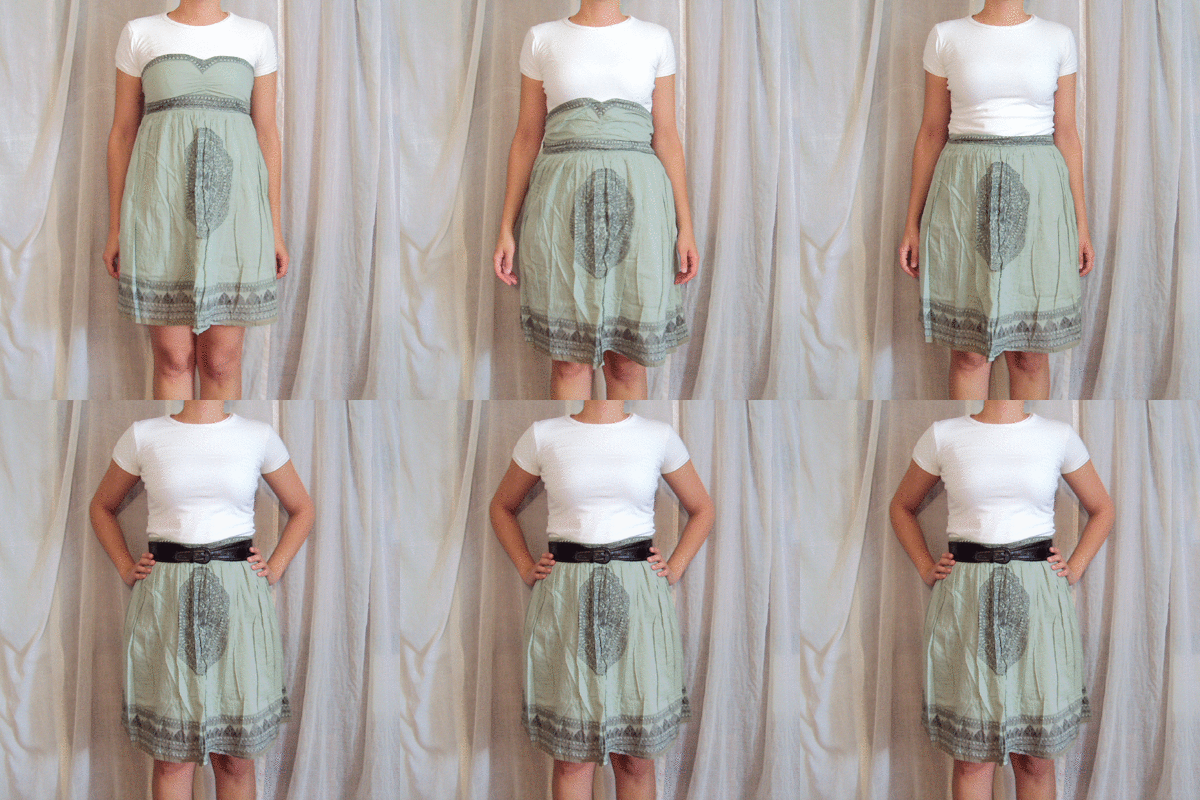
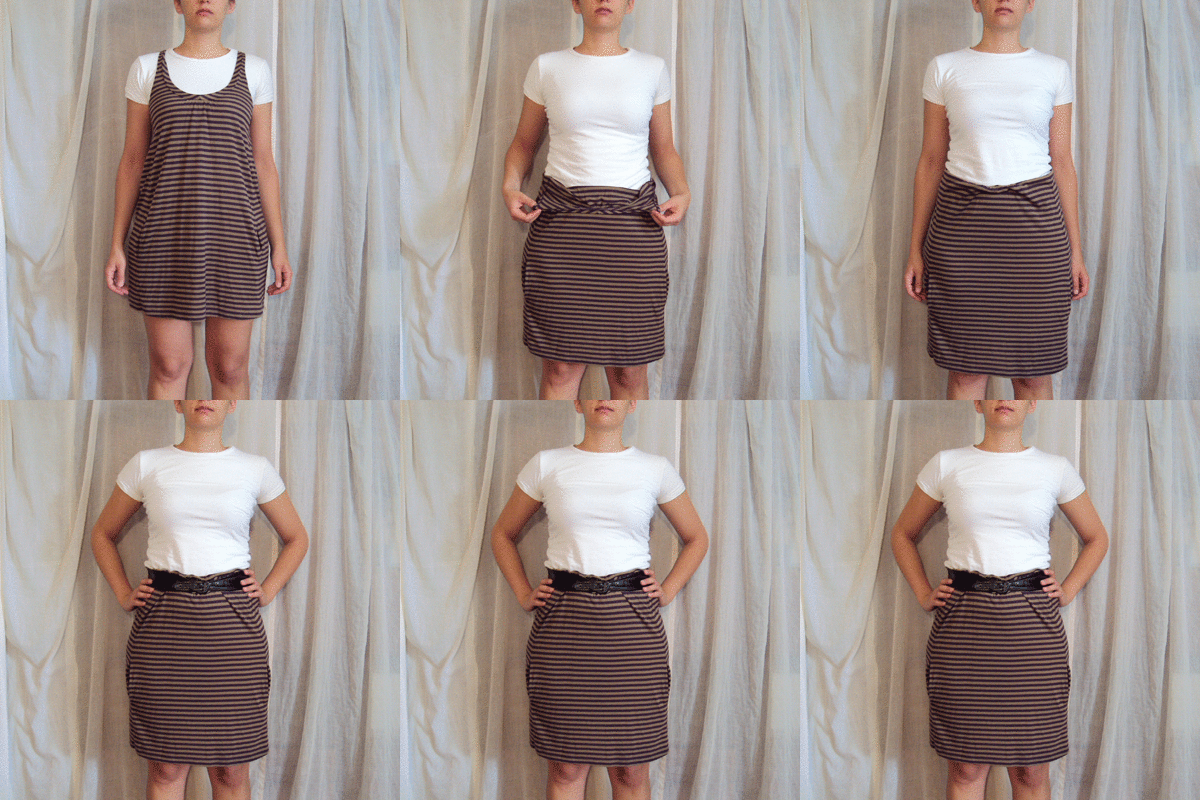
After mentioning that the skirt I wore in this post was actually a dress, many of you asked how I did that. I never thought of it as hard to do, but I felt I should honour your query with some illustrated instructions. And while I was at it, why not show a couple more cases?

Example 1: The woven A-line sundress

The dress that started it all. It's a tiered dress that flares into an A-line under the bust, made from light-weight poplin. All these qualities make it way easier to style into a skirt: You just slip the straps off your shoulders, pull it down until the part that used to sit under the bust now sits on the narrowest part of your waist, tuck the bust part in and belt it all into place. The fact that the under-the-bust seam is sewn with elastic makes it relatively stable.

Example 2: The strapless dress

Another easy one to style into a skirt. This particular one is also ruched in the back, which also helps. Again, just slip it down to your waist, tuck in the part that's supposed to cover your bust and secure into place with a belt.

Example 3: The t-shirt fabric loose dress

The last one is also the hardest to nail. Unlike the first two, this one's fabric is not woven but knit (what we refer to as "jersey" here in Greece) so it's not as stable. Plus, this dress isn't fitted at the bust, which would have helped. Fear not though, it still can be done! All you have to do is pay a little extra attention on how you arrange the extra fabric into makeshift pleats, after you slipped it down your waist and tucked it in. It has to resemble a paper-bag waist that won't be sewn, but held in place by your belt.

It's rather versatile having the option of wearing a single dress either as a beach cover-up in the morning or as part of an evening outfit (paired with a simple vest, a nice belt and some interesting accessories) all without any sewing needed and while being fully reversible. Nice thought to have in mind when packing for holidays.

As you can see, yanking the dress down to your waist makes the hem several inches longer.
I like that effect, since I'm on the tall side and like my hems knee-length, which are often hard to find. However, if your dress is already knee-length, the resulting skirt could be a little too long for your liking. You can embrace that new, retro-inspired length (it is in vogue after all, as Fashion Editor at Large has mentioned) or you can combat it by tucking in more fabric at the waist. Or just try again with a shorter dress.

Also keep in mind that simple and lightweight dresses work best for that cause. Heavier fabrics and structured designs like boned bodices or molded cups will inevitably add too much bulk.

Happy tucking and belting!

Tuesday, 2 March 2010

Shoergery


The good news:
As mentioned in that previous post, I found a lovely pair of Maloles grey suede concealed platform round-toe mary janes with clips and laces, for 70% off. Bargain, no?


The bad news:
They were faulty. Meaning they were missing two fastening clips on one side of the right shoe. Probably a fault from the factory, as it looks like they hadn't been properly stitched on in the first place.


More good news:
I managed to locate both clips (with the help of the wonderful shopping assistant of Simple Caractere over at Empoli outlet) and started laying out a DIY plan for making those babies walk the streets again.


I chose my weapons (black elastic cord and metallic wire) and got down to business.


Luckily, I had a whole roll of cord (I have quite the arsenal of DIY materials at home) quite similar to the one used on the clips, but even if I didn't, cutting up a small black hair elastic would do. I cut a 15cm piece, just to be on the safe side.


Took some metallic wire, folded it in a loop, put it through both holes of the shoe and threaded the cord. Then I simply pulled it through.


I took one of ends completely out of the holes, attached the missing clip and then I repeated the procedure with the wire to take it back through the holes again.


Once on the other side, I adjusted the second black clip as well and calculated how much elastic was needed in order to have the same give as on the other shoe.


I then proceeded to tie a strong knot and cut the excess elastic off.


Fixed it! Someone would have to look really, really, REALLY carefully to spot the difference, no?


Hello my lovelies!

Wednesday, 6 January 2010

Hang in there little skirt


Oh, the mysteries of the universe. For example, why do all major clothes manufacturers - H&M, Zara and Topshop to name a few - insist on adding ribbons to their t-shirts for us to hang them by?

Hello? We have shoulders for that.

I'm sure lots of you fine people out there soon get fed up of constantly tucking away those little annoying bastards that insist on peeking out of your clothes and reach for the scissors to chop them off. Right? Cause that's what I do. And then, of course, you can't bear to throw away the ribbons, as (read in Valley girlish) they're like soooo cuuuuuuute. And then you end up with a bunch of cuuuuuuute ribbons (if you don't feel the need to use the letter U seven times, there's not enough cuteness) just waiting for you to transform them into some amazing DIY project you haven't exactly conceived yet.

Yeah, been there, done that.

Listen sistah, it just ain't happening.

On the other hand, we have the curious case of the ribbonless skirt. According to my totally scientific research, 93,7% of skirts don't come with ribbons on the sides for us to hang them from.

Can you guess where I'm getting to?

So, tonight is the night I will address this injustice. I officially declare this the sewing-the-hang-ribbons-cut-from-my-t-shirts-onto-my-skirts night. Let the sewing begin.

Thursday, 11 December 2008

Sewing *hearts* graffiti

As promised, it's finally time to reveal my super secret sewing project that everyone was wondering about. My loyal readers already know that the boyfriend is a graffiti artist and that he also had his birthday last weekend. A year ago I was striving to find the perfect present for him. I gave it a lot of thought, as I wanted something unique and special. Something that would reveal myself and what I think of him. And us. I thought, he's creative, I'm creative. Is there a way to combine our crafts, graffiti and sewing? And I had an idea. I took one of the girl characters he draws on walls - my favourite at the time - and made it into a plush doll.
That was last year. I could go on and on forever analyzing it, but I won't. I will just say the process was extremely time-consuming, as it was all by hand, but I loved every second of it and from what I saw, he loved it too.

This year the pressure was greater, but so were my sewing skills. Plus, I finally had a sewing machine in my disposal, which I put in good use. This is what happened:
And what a happy boy! Happy birthday!

Wednesday, 10 December 2008

Home*sewing

As the mayhem in Greece continues, I'm learning to appreciate the sacred refuge of my home. I love my house and the calm environment it provides me, and I like to keep it in a good condition, so I can enjoy the benefits. So, I spent my day pampering it. I swept, I mopped, I did the laundry and the dishes. And it feels so good afterwards, to sit back with a bowl of warm mushroom soup - from a sachet, but who cares - and just relax.

And what better timing to get some sewing done?It feels like I've been sewing this skirt forever! I bought the fabric back in early October and even showed it to you on this post, along with all my inspiration for the finished product, all eager and excited. Little did I know... At first I discovered I didn't have any plum-coloured thread. I got some, then realized I had used up all my waist elastic for other skirt projects. When I got some more elastic, I found out that the thread was a tad bit too light for the fabric. Bummers! I got some darker thread, but then another extremely time-consuming project came up, and it all fell back again. And now that I thought I would finally nail the bastard, I realised I should better get some lining too. Will I ever get to wear that skirt, or is the universe trying to tell me something?
I'm not giving up though. I will get some plum lining tomorrow and hopefully, I will be wearing my skirt come evening.
Right, universe?

Oh, and to all my kind readers wondering what that other project was about, all I have to say is sorry I kept you guessing for so long! I will most probably have pictures tomorrow.
A little hint: It was a present for my boyfriend's birthday.
Tomorrow!

Friday, 5 December 2008

Sewing the night away

Big secret sewing project in the making. It's already 2:00 and it looks like I'm not going to bed for at least two more hours. Gotta finish before I go!

Monday, 22 September 2008

Shoelution

MDF boards


toilet paper cardboard cylinders


a mess of shoes


all the components


it has begun


almost there


finished!

Sunday, 3 August 2008

DIY rocks!

Back in the day, I casually mentioned that I finally got myself a sewing machine and proclaimed that the wonderful world of home-sewing would soon be my kingdom. Well, I haven't exactly been productive, but sometime in late May, I managed to do this little alteration:The dress is by Bershka and I bought it on sale for 3 euros. Well, 2.95 to be exact. It was supposed to be a kind of loose beach dress, but the multi-colored band wouldn't fit around my chest. However, it had exactly the circumference of my under the bust measurement and I also had a pair of gray leggings I never wore, so I had an idea...Wore it last night with white flip-flops and it felt great!

Saturday, 21 June 2008

DIY bikini

Hey, wanna learn how to make your own two-piece bathing suit? The nice people at Expert Village found just the person to show us how and made a series of tutorial videos.
In this free video series, expert Jennifer Crow from Wedgie Wear shows you how to design and make your own custom, triangle-top bikini. She covers patterns and fabrics, spandex and elastic, and much more. You will learn how to cut the bottoms, how to hem the edges, sew on a waistband, fit the elastic into the edges, and how to make it all trimmed and professional-looking. You will also learn how to design the triangle tops, how to sew straps and create professional hems, and how to line or pad the spandex.
She does use a serger at the beginning, but I'm sure it's possible to use just a simple sewing machine and lots of patience. Now, if only I could find the time!

Monday, 16 June 2008

Just a thought

Along with the kiddies' shoes I also brought home from ZARA some serious, grown-up stuff. These delicious plum-colored open-toe rope wedges. Yeah, I like to say it all. You can't see it here, but they also had ankle straps, which we all know undo all the hard work the heels do to elongate the calves. I knew they had to come off immediately. And they did, as soon as I had the chance. Holding the plum straps with the little gold buckles on my hand, I remembered those:
They also lost their little ankle straps, which I had kept. And then, a light bulb popped over my head: